I really wanted to just title this post “Epic Birthday Cake Extravaganza” but I didn’t want to be too misleading 😛 Oh well…
I know I have been the worst at blogging, but life has been a wee bit on the crazy side for the past several weeks, and it doesn’t promise to slow down, well, ever.
At the very beginning of the summer, just after having returned from France, I was emailed by one of my dad’s work acquaintances and was asked to make a cake for her twins birthday party in July. Of course I was honored to be asked, but I thought quite awhile before committing to the cake because it was way out of the realm of anything I had done before. I had been commissioned to make things in the past–but that was mostly just a dozen cupcakes here and there, or a few hundred mini desserts for a family-friends graduation party or something. I had never done something so big for someone I had never met.
And after deciding that I needed to get some experience under my belt if I was going to take a potential future career in the pastry world seriously, I closed my eyes and jumped into the treacherous and absolutely terrifying deep end of life…by sending a very anticlimactic email saying “yes.”
The entire process from that first email to the final delivering of the cake was much longer than I thought it would be, and not to be cheesy (though if you regularly read my blog you know that I am actually the cheesiest person ever, no matter how much I try to deny it) but I learned so much throughout the process.
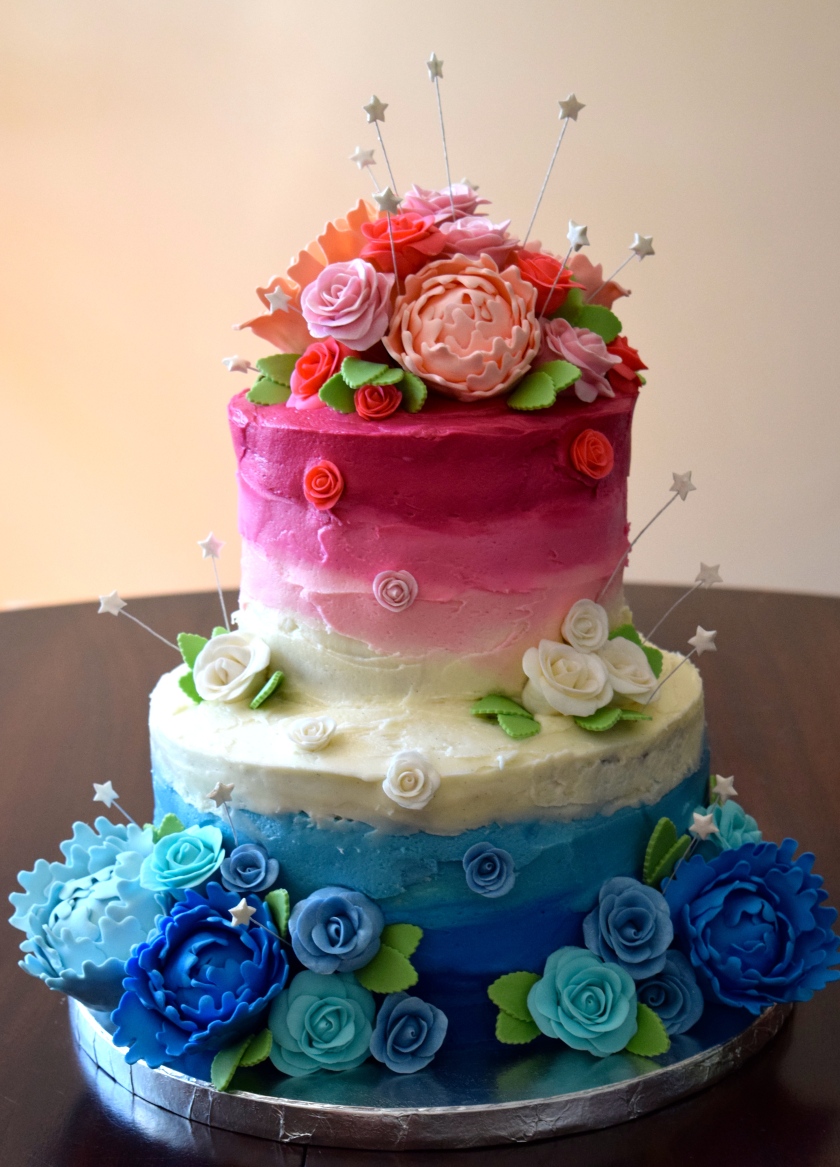
Yes the cake ended up beautiful and I am about to shove a bunch of pictures of every possible angle of it down your throats, but I also learned how much time it takes to make a gumpaste peony and how I want to communicate with potential future clients and a realistic price range that I need to inform clients of up front before I let my imagination get away with me. And now that I have learned these things and am ready to take on potential new clients I am leaving the country for five months >_< BUT that is not the point!
Because it would be boring and take a novel to tell you the entire process in detail, I am going to outline it for you (though feel free to message me if you want to know more ;)). Basically I went from emailing to sketching, to asking questions, to answering questions, to re-sketching a new cake in the first month. Then two weeks before the cake was to be delivered I planned out the execution of the actual cake: I bought supplies for the decorations 10 days before, started on the gumpaste about a week before, made the cake two days before, and the frosting the morning of.

The final amount of gumpaste decorations

Trying to pre-plan the top of the cake on some styrofoam

6 colors of frosting!

The state of the cakes before moving them to my car–terrifying that I had no idea what the cake would really look like until I was at the final destination!
Then the day of I assembled the two tiers separately–stacking and frosting each cake and sticking wooden dowels into each cake at my apartment–before freaking out moving three styrofoam blocks filled with gumpaste decorations, a pan filled with each color of extra frosting, both cakes, utensils, my apron, and my pride into my (disgustingly hot) car.
So everything is in my car and I’m ready to go right?
Did I mention its about 90 degrees and my car has been sitting in direct sunlight all day? And that the house–30 minutes away–has no power and thus no air conditioning from a storm the night before?
Yep, I wasn’t freaking out at all. Totally calm. Its not like my cakes were starting to melt or anything.
So I did what any fully functioning adult does. I called my mom.
And after venting about how my life was over because my cakes would be destroyed, my car’s air conditioning finally kicked in full-blast, and I made it (despite driving like an elderly person with a baby in their car) to the house I was delivering the cake to.
Now, I am an incredibly awkward and introverted person who hates being hot…and is a perfectionist… So I was incredibly proud that I semi-normally managed to introduce myself and make some amount of small talk as I carried all of my cake materials into a still-not-air-conditioned house and stacked my now-unfortunately-warm cakes and prayed to every deity in existence that my cakes wouldn’t simply melt and droop all over the table.

Stacked cake, free of all the decorations
After fixing the frosting and painstakingly adding all of the decorations one-by-one (while trying to explain why I am an Asian Studies and Linguistics major who decided to move to France for pastry school) the cake was DONE. So of course I took about a hundred pictures, cleaned up all my materials, and drove away in a rush so that the family could finish preparing for their kids birthday party.

I got everything into my car and then just sat there for a solid minute. Did that just happen? I literally spent 26+ hours creating the most beautiful cake I have ever made, and I just gave it away? (Okay yes I got paid but still…) I seriously felt like I gave away my child.

Even though it was probably the most stress-inducing thing I have done this summer, and caused more tearful breakdowns to my mom than I would like to admit, I would do it again in a heartbeat. Just by doing something like this once, I have a strategy to make it better the next time I have the chance to do something like this. So if anyone is in the market for a cake January-March 2016 hit me up 😛 …Or just wait until I am done with pastry school…so 2017…. then I will be back in the country…. probably…


The top layer of the cake is a strawberry layer cake (6″), the bottom layer is a double batch chocolate cake (8″), and the frosting despite being different colors is all vanilla–all recipes are from Sweetapolita.
Strawberry (or Raspberry*) Layer Cake
from Sweetapolita
Ingredients:
1 3/4 cups sugar
1 package strawberry or raspberry* flavored gelatin
1 cup butter, softened
4 eggs
3 cups flour
1 T baking powder
1/4 teaspoon salt
1 cup whole milk + extra as needed
1 T vanilla extract or paste
1/4 cup strawberry or raspberry puree*
* I am sure you could use basically any fruit puree + gelatin flavor combination, but so far these are the only two that I have tried, and the original recipe used Strawberry for both
Directions:
1) Make the strawberry puree by blending fresh or thawed strawberries with a little bit of water until a smooth and thick paste is formed. Set aside.
2) Preheat your oven to 350 degrees Fahrenheit, and prepare 4 6″ cake pans by greasing and lining them with parchment. Set aside.
3) In a small bowl whisk the milk, strawberry puree and vanilla. In a separate bowl whisk the dry ingredients.
4) In the bowl of an electric mixer, beat the sugar, gelatin and the butter on medium speed until fluffy. Add in the eggs one at a time.
5) Add the wet and dry ingredients in small increments, alternating each type. If the batter is too thick after adding everything in, add in splashes of milk until you reach a desirable consistency.
6) Divide the batter between the prepared pans and bake for 30 minutes. After 30 minutes, check the cakes and bake for another 5-10 minutes if they are not done. For some reason my cakes took about 40-45 minutes to cook completely.
7) Let the cakes cool completely on a wire wrack and then wrap them in plastic wrap and place in the refrigerator or freezer until you are ready to use them.
Chocolate Layer Cake
from Sweetapolita
Ingredients (for a single batch–I doubled this because I wanted four thick layers for my base)
2 1/4 cups flour
2 1/4 cups sugar
1 cup cocoa powder
1 T baking soda
1 1/2 teaspoons baking powder
1/4 teaspoon salt
1 1/2 cups buttermilk
1 cup hot coffee
3/4 cup vegetable oil
2 teaspoons vanilla extract or paste
3 eggs
Directions:
1) Preheat oven to 350 degrees Fahrenheit, and prepare three 8″ round pans by greasing and lining with parchment paper. Set aside.
2) Sift flour, sugar, cocoa, baking powder, baking soda and salt in a bowl and set aside.
3) In a different bowl, whisk the buttermilk, coffee, oil and vanilla, then whisk in the eggs.
4) Add the liquid ingredients to the dry ingredients, whisking until everything is smooth and combined.
5) Divide the batter between the pans equally and bake for about 25 minutes. Let the cakes cool completely on a wire wrack and then wrap in plastic wrap and place in the refrigerator until ready to use.
Vanilla Frosting
from Sweetapolita
Ingredients (I used a triple batch because I wanted to make sure I had enough for everything)
1 cup butter, softened
1/2 cup vegetable shortening
pinch of salt
5 cups powdered sugar (plus extra as needed)
2/3 cup heavy cream
2 teaspoons vanilla paste
gel food coloring as desired
Directions:
1) Beat the butter, shortening and salt until light and fluffy.
2) Gradually add the sugar, heavy cream and vanilla. Add additional sugar if needed.
3) Continue to beat for 5-10 minutes until light and fluffy. Add in colors as desired.

Stunning!